How to Rewire a Table Lamp sounds intimidating, but it’s actually a practical project that many people can handle at home. Whether your lamp flickers, won’t turn on, or you just want to update old wiring, learning how to rewire a table lamp can save money and extend the life of a favorite piece.
With the right tools, patience, and a clear process, you can make your lamp safe and reliable. Let’s walk through everything you need to know, from tools and safety to step-by-step instructions, troubleshooting, and useful tips.
Understanding Lamp Wiring Basics
Before starting, it’s helpful to understand how a table lamp is wired. Most lamps in the US use a two-wire system: one wire carries electricity to the bulb, and the other returns it. The wires connect to the lamp’s socket (where the bulb screws in) and to a plug at the end of the cord. Common signs of wiring issues include flickering bulbs, burnt smells, or the lamp not turning on.
Why Rewire?
- Safety: Old, cracked wires can cause shocks or fires.
- Function: A lamp that doesn’t work is useless.
- Style: New cords and sockets can modernize an old lamp.
According to the U.S. Consumer Product Safety Commission, electrical faults cause thousands of home fires each year. Rewiring reduces risk and ensures your lamp works smoothly.
Tools And Materials You’ll Need
Gathering the right tools makes the job easier and safer. Here’s a practical list:
- Screwdriver (flat and Phillips)
- Wire cutter/stripper
- Replacement lamp cord (usually 18-gauge, 6–8 feet)
- Replacement plug (if needed)
- New lamp socket (if old one is damaged)
- Electrical tape
- Needle-nose pliers
- Voltage tester (optional, for extra safety)
- Wire nuts (sometimes needed for certain lamp styles)
Buying a lamp rewiring kit can simplify shopping, as it often includes cord, socket, and plug.
| Tool | Purpose | Cost Estimate |
|---|---|---|
| Screwdriver | Remove lamp parts | $5-$10 |
| Wire cutter/stripper | Cut and strip wires | $8-$15 |
| Replacement cord | New wiring | $5-$10 |
| Socket | Connect to bulb | $6-$12 |

Safety First
Electrical safety is crucial. Unplug the lamp before you begin. Never work on a lamp plugged into power. If you’re unsure about any step, ask an experienced friend or consult a local electrician.
- Check for damaged wires: If you see cracks or burn marks, replace the cord.
- Test with a voltage tester: Make sure there’s no current before touching wires.
- Work in a dry area: Water and electricity are dangerous together.
Step-by-step Guide To Rewiring A Table Lamp
Let’s break down the process into clear steps. Most table lamps are similar, but designs vary. Adjust steps as needed for your lamp.
1. Disassemble The Lamp
- Unplug the lamp.
- Remove the shade and bulb.
- Unscrew the socket cover (the metal or plastic part holding the bulb).
- Note how the old wires are connected. Taking a photo can help during reassembly.
2. Remove Old Wiring
- Use needle-nose pliers to disconnect wires from the socket.
- Pull the old cord out from the base.
- If the plug is removable, unscrew and disconnect it; otherwise, cut the cord near the plug.
3. Prepare The New Cord
- Cut the new cord to your desired length (usually 6–8 feet).
- Use the wire stripper to remove about 1/2 inch of insulation from both ends.
Cord Comparison
| Cord Type | Safety Rating | Common Length |
|---|---|---|
| 18-gauge SPT-1 | UL Listed | 6–8 feet |
| 16-gauge SPT-2 | Extra durable | 8–10 feet |
4. Thread The Cord
- Feed the new cord through the lamp base and up to the socket.
- Some lamps have a narrow hole; use pliers to help guide the cord.
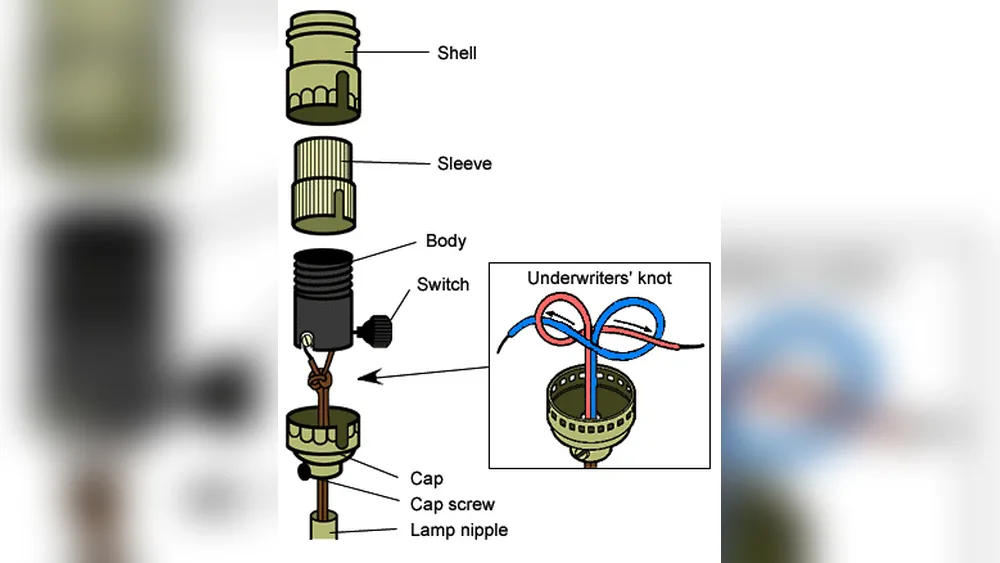
5. Connect Wires To Socket
- Most lamp sockets have two screws: Gold and silver.
- The ribbed wire (neutral) connects to the silver screw.
- The smooth wire (hot) connects to the gold screw.
Tip: If wires aren’t marked, use a voltage tester or check packaging. Correct wiring prevents shocks.
- Loop each wire around its screw and tighten firmly.
- Cover connections with electrical tape if extra protection is needed.
6. Reassemble The Socket
- Slide the socket cover back over the wiring.
- Snap or screw it closed.
- Make sure the socket is snug and doesn’t wobble.
7. Attach Or Replace The Plug
- If using a new plug, open the plug casing.
- Attach each wire to the plug terminals (follow instructions on the plug).
- Close the plug casing securely.
8. Test Your Lamp
- Plug in the lamp and switch it on.
- If the bulb lights up, you’ve succeeded.
- If not, unplug and double-check all connections.
Practical Tips For Success
- Take photos: Before removing wires, snap a picture for reference.
- Label wires: Use masking tape to mark which wire goes where.
- Work slowly: Rushing can lead to mistakes or unsafe wiring.
- Check socket size: Not all sockets fit every lamp. Bring the old one to the store for comparison.
Beginners often overlook the importance of matching the cord gauge to the lamp’s wattage. Using too thin a wire for a high-wattage lamp can cause overheating. Also, many people forget to secure wires tightly, leading to loose connections that cause flickering or shorts.
Common Mistakes To Avoid
- Mixing up wires: Hot and neutral wires must be connected correctly. Mixing them is unsafe.
- Leaving exposed wire: Always cover bare wire with insulation or tape.
- Using the wrong socket or plug: Not all parts fit every lamp. Check compatibility.
- Over-tightening screws: Screws should be snug, not crushed. Too tight can break wires.
| Mistake | Result | Solution |
|---|---|---|
| Wrong wire connection | Shock risk | Follow color/ribbing guide |
| Loose wires | Flickering bulb | Tighten screws |
| Exposed copper | Short circuit | Use tape or wire nuts |

Troubleshooting After Rewiring
If your lamp doesn’t work after rewiring, try these steps:
- Check the bulb: Sometimes, the bulb is dead—not the wiring.
- Check connections: Open the socket and plug to ensure wires are attached.
- Test the outlet: Plug another device in. If it doesn’t work, the problem is the outlet.
- Look for frayed wires: Replace any damaged wires.
When To Call A Professional
If you notice burning smells, smoke, or if your lamp has complex wiring (like three-way switches), it’s safer to call an electrician. Some vintage lamps have special parts or require unique wiring techniques. Safety always comes first.
Real-life Example
Sarah had an old brass lamp from her grandmother. It stopped working and the cord looked worn. She bought a rewiring kit for $15, followed the steps above, and brought the lamp back to life in less than an hour.
Now, it’s safe and works perfectly. Many people find that rewiring is easier than expected.
Extra Resources
For more safety tips and wiring guides, you can visit Family Handyman. This site offers clear photos and advice for beginners and advanced DIYers.

Frequently Asked Questions
Can I Use Any Cord To Rewire My Lamp?
No, you should use lamp-rated cord, usually 18-gauge SPT-1 or SPT-2. Other cords may not be safe or compatible.
How Long Does Rewiring A Table Lamp Take?
Most rewiring jobs take about 30–60 minutes. If it’s your first time, allow extra time to double-check connections.
Is It Safe To Rewire A Vintage Lamp?
Yes, but check for special parts or unusual wiring. Some vintage lamps use unique sockets or materials. If unsure, ask a professional.
What If My Lamp Has Three Wires?
Some lamps have three-way switches or grounding wires. Follow instructions for your lamp, or seek guidance for three-wire systems.
Can I Change The Color Of The Cord?
Yes, lamp cords come in various colors. Choose one that matches your decor, but make sure it’s rated for electrical safety.
Rewiring a table lamp is a rewarding project that boosts safety and gives new life to old favorites. By following clear steps and keeping safety in mind, even beginners can succeed. With just a few tools and an hour of your time, you can make your lamp shine again—literally and figuratively.