How to Fix Xmas Lights flickering, dim, or not lighting up at all? Don’t let a few faulty bulbs steal the magic from your holiday decorations.
You can fix your Xmas lights quickly and easily with just a little know-how. Imagine turning those dull strands back into a sparkling display that lights up your home and brings smiles to everyone who sees them. In this guide, you’ll learn simple steps to find and fix the problem bulbs, replace blown fuses, and get your lights shining bright again.
Keep reading, and by the end, you’ll have the confidence to repair your Xmas lights like a pro—no frustration, no hassle, just festive cheer!
Credit: www.homedepot.com
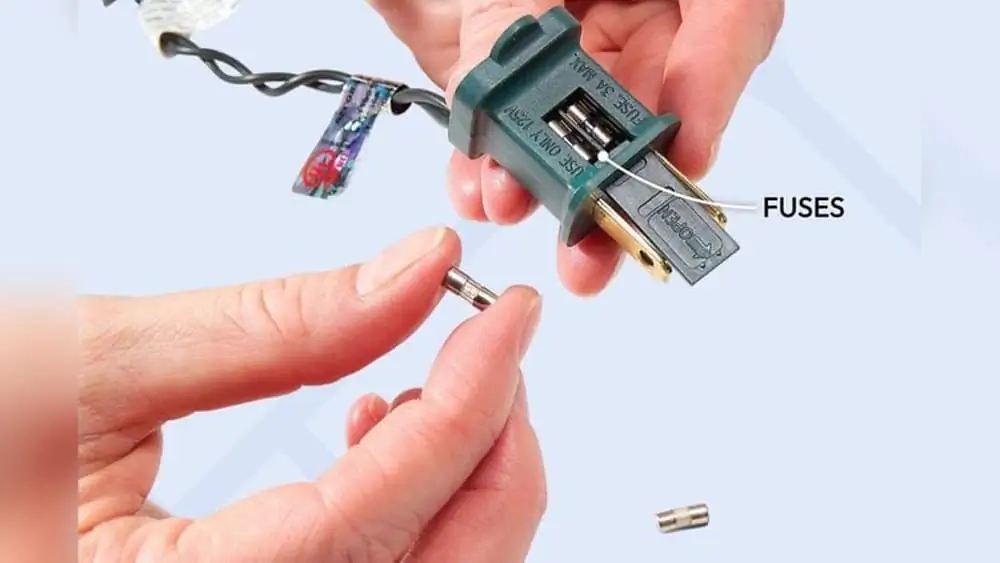
Check And Replace Fuses
Checking and replacing fuses is a key step in fixing Christmas lights. Fuses protect the lights by stopping electrical problems. A blown fuse can cause the entire string to stop working. This section explains how to locate, inspect, and replace fuses easily. Follow these steps to get your lights shining again.
Locate Fuse Compartment
Unplug the string of lights before starting. The fuse compartment is usually inside the plug. Look for a small sliding or snap-open cover. It may have a tiny screw or latch. Use your fingernail or a small tool to open it carefully. This compartment holds one or two tiny fuses.
Inspect And Swap Fuses
Take out the fuses gently. Hold them up to the light to check inside. A good fuse has an unbroken thin wire. A blown fuse shows a broken or blackened wire. Replace any blown fuses with new ones that match the size and rating exactly. Insert the new fuse firmly in the compartment.
Use Spare Fuses From Kit
Many Christmas light kits come with spare fuses. Keep these fuses in a safe place. Use a spare fuse only if it matches the old one’s rating. Using the wrong fuse can cause damage or fire. If your kit does not have spares, buy replacements from a store. Test the lights after replacing the fuse to see if they work.
Inspect And Replace Bulbs
Inspecting and replacing bulbs is a key step in fixing Christmas lights. This process ensures the entire string lights up evenly. It helps spot bulbs that are burnt out, cloudy, or loose. Replacing faulty bulbs can save time and avoid replacing the whole set.
Uncoil And Examine Bulbs
Start by uncoiling the string of lights gently. Lay it flat on a clean surface for a clear view. Look closely at each bulb for cracks or cloudiness. Check if any bulbs are missing or appear darker than others. This careful inspection helps identify bulbs that need replacing.
Replace Burnt-out Or Cloudy Bulbs
Remove bulbs that do not light or look damaged. Use the replacement bulbs from your kit or a matching set. Insert the new bulbs firmly into the sockets. Burnt-out or cloudy bulbs often cause breaks in the circuit. Replacing them restores the flow of electricity and brightness.
Ensure Bulbs Are Seated Properly
Loose bulbs can stop the entire string from working. Press each bulb firmly into its socket. Wiggle bulbs gently to check if they are secure. Proper seating keeps the circuit complete and lights shining. Double-check all bulbs for a tight fit before testing the lights.
Use A Light Tester
Using a light tester simplifies fixing Christmas lights. It helps find problems fast. This tool saves time and effort. No more guessing which bulb is bad. The light tester quickly points out the trouble spots. It works well even for beginners. Anyone can use it to repair their Christmas lights.
How Light Testers Work
A light tester checks the electrical flow in the light string. It sends a small current through the wires. The tester shows if electricity passes or stops. If the current stops, the tester signals a problem. This helps locate the exact spot that fails. The tester often uses lights or sounds to show results.
Pinpoint Faulty Bulbs
Use the tester to find bulbs that do not work. Place the tester’s probe on each bulb’s socket. If the bulb is good, the tester lights up or beeps. A dead bulb causes no response from the tester. Replace bulbs that fail the test. This stops one bad bulb from darkening the whole strand.
Test Fuse With Light Tester
The tester can also check fuses inside the plug. Open the fuse compartment carefully. Touch the tester probes to both ends of the fuse. A good fuse lets current flow, and the tester reacts. A blown fuse shows no current flow. Replace blown fuses with the correct type to fix the lights.
Credit: www.youtube.com
Spot Damaged Wires And Sockets
Spotting damaged wires and sockets is key to fixing Xmas lights safely and effectively. Faulty wiring or sockets often cause lights to fail or flicker. Careful inspection reveals hidden problems before they get worse. This step saves time and avoids electrical hazards during repairs.
Look For Frayed Or Broken Wires
Check the entire length of the light string. Look closely for frayed, cracked, or broken wires. These can cause shorts or open circuits. Pay attention to areas near the plug and where wires bend. Damaged wires may have exposed copper or discoloration. Replace or repair any damaged section to ensure safe operation.
Identify Damaged Sockets
Inspect each bulb socket for cracks, corrosion, or burn marks. Sockets that are loose or broken may not hold bulbs securely. Corrosion inside sockets can prevent electrical contact. Use a small flashlight to see inside each socket clearly. Replace sockets that show damage or fail to hold bulbs tightly.
Safety Tips For Repairs
Always unplug the lights before inspecting or repairing them. Avoid working with wet hands or in damp areas. Use insulated tools when handling wires or sockets. Never attempt repairs on a plugged-in string. Test the lights after repairs outdoors or away from flammable materials. Follow these safety steps to prevent shocks or fires.
Find The Bad Bulb
Finding the bad bulb is the key step to fixing your Xmas lights. One faulty bulb can cause the whole string to go dark. You need to check each bulb carefully to find the problem. Use simple tools and methods to spot the bad one quickly. This section explains easy ways to find the faulty bulb in your Christmas lights.
Visual Signs Of Faulty Bulbs
Start by unplugging the lights. Look closely at each bulb for cracks or dark spots. Bulbs with cloudy or broken glass usually do not work. Check if any bulb looks loose or out of place. These visual clues help you spot bulbs that need replacement.
Swap Method To Identify Dead Bulbs
Try swapping a bulb from a working part of the string with a suspicious one. If the problem moves, you have found the bad bulb. Replace the dead bulb with a new one from your spare kit. This method saves time and avoids guessing.
Use Light Tester For Verification
A light tester makes finding bad bulbs easier and faster. Follow the tester’s instructions to check each bulb. The tester shows where the current stops. Replace the bulb where the tester indicates a fault. This tool is helpful for long or complex light strings.
Prevent Future Issues
Preventing future problems with your Christmas lights saves time and effort. Simple care and attention extend their life. Avoid frustration and keep your decorations shining bright year after year.
Proper Storage Tips
Store lights carefully after the season ends. Use a spool or a cardboard piece to wrap the string. Avoid tangling wires to prevent damage. Keep lights in a dry, cool place. Moisture and heat can harm the wiring and bulbs.
Avoid Overloading Circuits
Do not connect too many strings together. Check the maximum number of strings allowed on the package. Plugging too many lights causes overheating and shorts. Use power strips with built-in circuit breakers. This helps protect your home and your lights.
Regular Maintenance Checks
Inspect lights before using them each season. Look for frayed wires and broken bulbs. Replace any damaged parts immediately. Test lights in small sections to find problems fast. Regular checks keep your display safe and bright.
Credit: www.cnet.com
Frequently Asked Questions
What Is The Easiest Way To Fix Christmas Lights?
Unplug lights and check fuses in the plug compartment. Replace blown fuses with exact matches. Inspect bulbs for damage or looseness and replace faulty ones. Wiggle bulbs to ensure good contact. Use a light tester to locate bad bulbs quickly.
Check wires for damage and replace the entire string if needed.
How Do You Know Which Bulb Is Out On Christmas Lights?
Check for blackened or cloudy bulbs first. Use a Christmas light tester or swap bulbs in the dark section to find the faulty one.
How Do You Fix Christmas Lights When Half the String Is Out?
Unplug the lights and check the fuse; replace if blown. Inspect and replace burnt or loose bulbs. Use a light tester to find faulty bulbs. Ensure wires and sockets are undamaged. Replace the entire string if wires are frayed or broken.
How To Find The Bad Bulb On Christmas Lights Without A Tester?
Unplug the lights, then inspect bulbs for blackening or damage. Replace loose or cloudy bulbs and wiggle each to find the bad one. Replace blown fuses if needed. Continue until the lights work properly.
Conclusion
Fixing Xmas lights takes patience and simple steps anyone can follow. Check fuses first, then replace any burnt-out bulbs. Wiggling bulbs can help restore the connection. A light tester speeds up finding faulty bulbs. Always inspect wires for damage to stay safe.
With care, your lights will shine bright again. Enjoy the festive glow without hassle or stress.


Pingback: How to Fix Blue Coolant Light | Troubleshooting and Solutions 2026
Pingback: Best Tape for Posters | Secure & Damage-Free Adhesion-2026