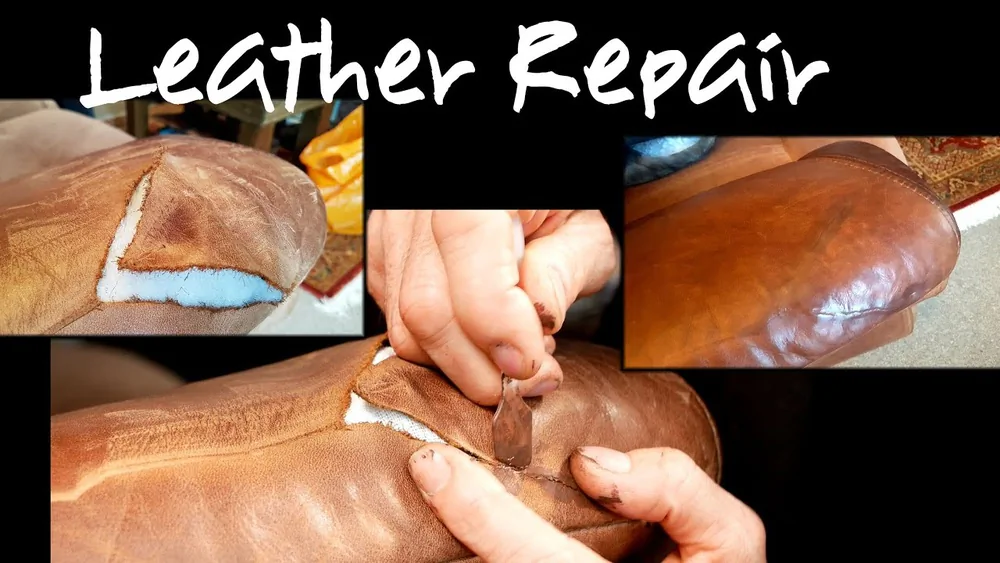
Leather furniture adds elegance to any room, but a tear can ruin its beauty and value. Many people think fixing leather is expensive or complicated, but with the right approach, you can restore your furniture at home. Understanding how to Fix Tears in Leather Furniture saves money and keeps your space looking stylish.
This guide will show you practical steps, compare repair options, and highlight common mistakes to avoid.
Understanding Leather Tears
Tears in leather furniture happen for different reasons. Sharp objects, pet claws, and age are the most common causes. Sometimes, small tears grow larger if ignored. Leather can be genuine, bonded, or faux. Each type needs a different repair method. Genuine leather is thick and flexible, while bonded leather is made from scraps and is less durable. Faux leather is synthetic and easier to clean, but repairs may not last as long.
| Leather Type | Durability | Repair Difficulty |
|---|---|---|
| Genuine Leather | High | Moderate |
| Bonded Leather | Low | High |
| Faux Leather | Medium | Easy |
If you notice a tear, act quickly. Dirt and oils can make repair harder, and larger tears cost more to fix.
Preparing For Repair
Before you begin, gather the right tools and materials. Cleaning the area is important for a strong repair.
- Leather repair kit (includes adhesive, filler, and color compound)
- Scissors (for trimming loose threads)
- Cotton swabs and rubbing alcohol
- Soft cloth
- Tweezers
- Sandpaper (fine grit, optional)
Make sure to clean the damaged area with rubbing alcohol. This removes oils and dust, letting the adhesive bond better.
| Tool | Purpose |
|---|---|
| Leather Repair Kit | Adhesion, filling, coloring |
| Scissors | Trim loose threads |
| Cotton Swabs | Apply alcohol |
| Soft Cloth | Clean surface |

Step-by-step Repair Process
- Clean the Tear
- Use a soft cloth and rubbing alcohol to clean the area.
- Let it dry fully before starting the repair.
- Trim Loose Threads
- Carefully trim any hanging threads or rough edges with scissors.
- Apply Sub-Patch (for Larger Tears)
- Insert a small piece of fabric under the tear using tweezers.
- This patch gives extra support to the repair.
- Apply Leather Adhesive
- Use a cotton swab to spread adhesive on the edges of the tear.
- Press the edges together gently and hold for a few minutes.
- Fill the Gap
- For deeper tears, apply leather filler in thin layers.
- Let each layer dry before adding more.
- Sand and Smooth
- Use fine sandpaper to smooth the filled area (if needed).
- Wipe away dust with a soft cloth.
- Color Matching
- Apply the color compound from your kit.
- Start with a small amount and build up until the color matches the original leather.
- Finish and Protect
- Let the repair cure for 24 hours.
- Avoid sitting or placing items on the repaired area during this time.
Most repairs take about 1–2 hours, plus drying time. For small tears, you may only need adhesive and color compound. Larger tears need a sub-patch and filler.
Comparing Professional Vs Diy Repairs
Many wonder if they should call a professional or fix tears themselves. Here’s a quick comparison:
| Method | Cost | Time Required | Result Quality |
|---|---|---|---|
| DIY Repair | $20–$50 | 1–2 hours | Good for small tears |
| Professional Repair | $100–$400 | 2–7 days | Best for large or visible tears |
DIY repairs are perfect for minor damage and save money. Professionals are better for deep or large tears, especially if the furniture is expensive or antique.

Tips For A Lasting Repair
- Pick a high-quality leather repair kit. Cheap kits often have weak adhesives.
- Test color compound on a hidden area before using.
- Work in a well-lit space to see details clearly.
- Don’t rush drying times—patience leads to stronger repairs.
- If your tear is near a seam or cushion, reinforce with extra adhesive.
A common mistake is skipping the sub-patch for larger tears. This leads to weak repairs that split again quickly. Another mistake is using too much filler, which leaves a noticeable bump.
Preventing Future Tears
Leather needs care to stay strong. Avoid placing sharp objects or pets on your furniture. Clean leather with a mild cleaner every few months. Condition it with a leather conditioner to keep it soft.
Direct sunlight fades and dries leather, making it more likely to tear. If possible, keep furniture out of the sun or use curtains.

Frequently Asked Questions
How Can I Tell If My Leather Is Genuine Or Faux?
Check the back of the material. Genuine leather has a rough, natural backing. Faux leather is smooth and sometimes has a fabric layer. Also, genuine leather smells earthy, while faux smells like plastic.
Can I Use Super Glue To Fix Leather Tears?
Super glue is not recommended. It hardens leather and can cause discoloration. A leather adhesive is designed for flexibility and color blending.
What Should I Do If The Tear Keeps Growing?
Stop using the furniture immediately and make a temporary patch with tape. Then follow the repair steps or call a professional for large tears.
How Long Does A Diy Repair Last?
Most DIY repairs last 1–3 years, depending on usage and care. Repairs on high-traffic areas may need touch-ups sooner.
Where Can I Find Good Leather Repair Kits?
You can buy quality kits at hardware stores, online shops, or specialty stores. For guidance on picking a kit, visit Consumer Reports.
Repairing tears in leather furniture is easier than you think. With the right materials and care, your furniture will look great for years. Even beginners can make smooth repairs by following the steps. Invest a little time, and enjoy your leather furniture without worry.