Looking to brighten up your how to Install Ceiling Light? Installing a ceiling light might seem tricky, but with the right steps, you can do it yourself safely and confidently.
Whether you’re replacing an old fixture or adding a fresh design to your room, this guide will walk you through everything you need to know. By the end, you’ll have a clear understanding of what’s involved, when to call a pro, and how to avoid common mistakes.
Ready to transform your room and save on installation costs? Let’s get started and make your ceiling light installation smooth and stress-free!
Tools And Materials
Installing a ceiling light requires the right tools and materials. Having everything ready makes the job easier and safer. This section covers the essential tools, how to pick the right fixture, and the safety gear you need.
Essential Tools
Start with a screwdriver set, including flathead and Phillips. A voltage tester helps check if wires are live. Wire strippers are needed to expose the wire ends safely. Pliers help twist wires together securely. A ladder or step stool is necessary to reach the ceiling. Have electrical tape and wire nuts to secure wire connections. A drill may be useful for mounting screws.
Choosing The Right Fixture
Select a light fixture that matches your room size and style. Check the fixture’s weight to ensure your ceiling box can support it. Choose the correct bulb type and wattage for brightness and energy use. Consider fixtures with easy-to-install features for beginners. Make sure the fixture fits the electrical setup in your home.
Safety Gear
Wear safety goggles to protect your eyes from dust and debris. Use insulated gloves to avoid electric shock. Turn off power at the circuit breaker before starting work. Have a flashlight handy to see inside dark spaces. Use a sturdy ladder with non-slip feet for safe climbing. Keep your work area clean and dry to prevent accidents.

Preparing The Area
Preparing the area is the first step in installing a ceiling light. It ensures safety and a smooth process. Taking time to get ready prevents accidents and mistakes. Follow these simple steps before starting the installation.
Switching Off Power
Turn off the power at the circuit breaker. This stops electricity flow to the fixture. Use a voltage tester to confirm power is off. Never skip this step to avoid electric shock.
Removing Old Fixture
Carefully remove the old light fixture. Unscrew any screws holding it in place. Gently lower the fixture to access the wiring. Disconnect wires by loosening wire nuts. Keep track of how wires connect for later.
Inspecting The Junction Box
Check the junction box for damage or wear. It should be securely fastened to the ceiling. Confirm the box can support the new fixture’s weight. Replace the box if it is cracked or loose. Proper support prevents accidents and fixture damage.
Wiring Basics
Understanding wiring basics is key to installing a ceiling light safely. Proper wiring ensures your light works well and prevents electrical hazards. This section covers how to identify wires, match their colors, and secure connections properly.
Identifying Wires
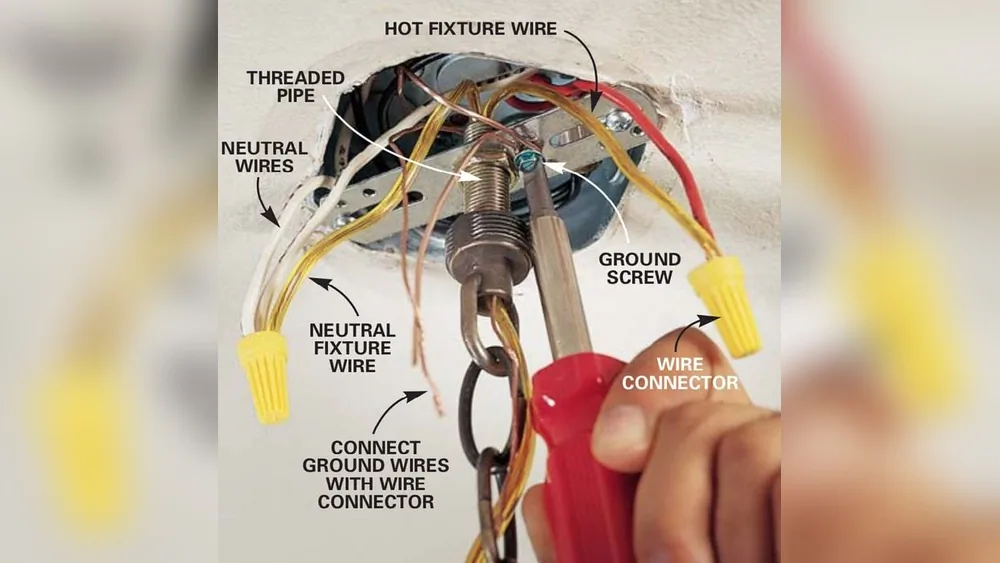
Ceiling wiring usually has three types of wires: live, neutral, and ground. The live wire carries electricity to the light fixture. The neutral wire returns electricity to the panel. The ground wire protects against electrical faults.
Look carefully at the wires in your ceiling box. They may be bundled or wrapped in tape. Use a voltage tester to check which wire is live. Always turn off power before touching wires.
Matching Wire Colors
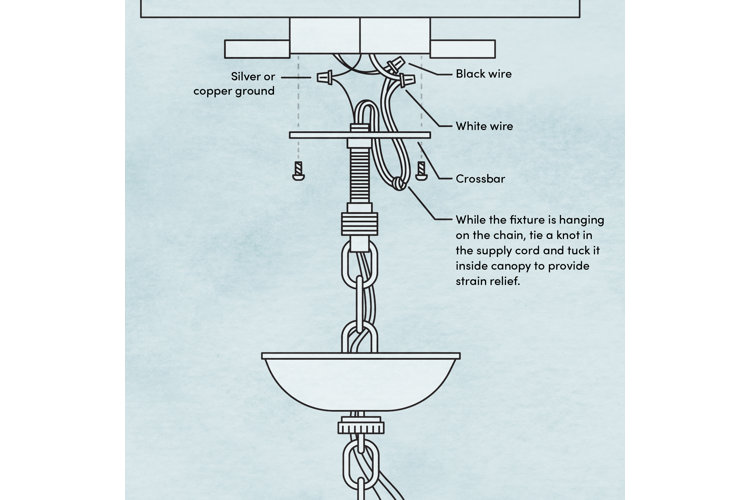
Matching wire colors is essential for safe installation. Usually, black or red wires are live. White wires are neutral. Green or bare copper wires are ground wires. Connect wires of the same color between the light fixture and ceiling wires.
Sometimes colors may differ. In that case, check the wiring diagram of your fixture. Follow local electrical codes for wire color standards.
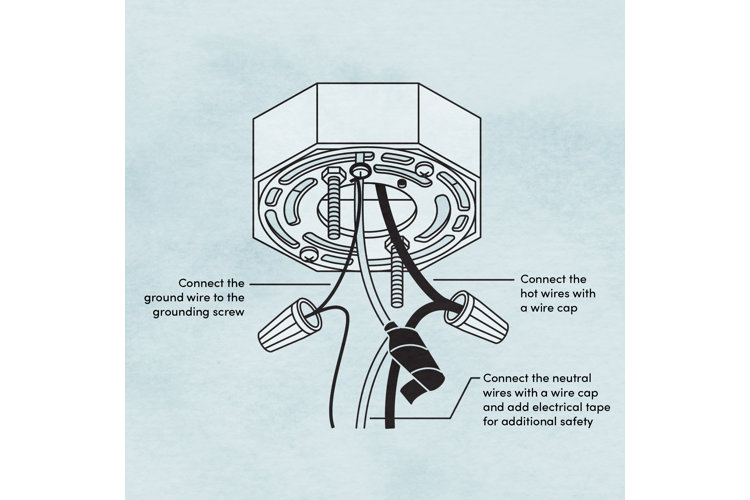
Securing Wire Connections
Secure wire connections tightly to avoid loose contacts. Use wire nuts to twist wires together. Make sure no bare wire is exposed outside the nut. Wrap connections with electrical tape for extra safety.
Push connected wires back into the junction box carefully. Ensure the fixture’s mounting bracket holds the light firmly. Loose wiring can cause flickering or electrical shocks.
Mounting The Fixture
Mounting the fixture is a crucial step in installing a ceiling light. This process secures the light fixture safely to the ceiling. Proper mounting ensures the fixture stays in place and functions well. Follow each step carefully to avoid damage or accidents.
Attaching Mounting Bracket
Start by attaching the mounting bracket to the electrical box in the ceiling. Use screws that fit the bracket and box holes tightly. Make sure the bracket sits flush against the ceiling surface. This bracket will hold the weight of the light fixture. Tighten the screws firmly but avoid over-tightening to prevent damage.
Supporting Heavy Fixtures
Heavy fixtures require extra support beyond the mounting bracket. Use a ceiling brace or support bar designed for heavy lights. Position the support between the ceiling joists for strength. Attach the brace securely to prevent any movement. This step prevents the fixture from pulling away or falling over time.
Fixing The Light To Ceiling
Once the bracket and support are secure, fix the light fixture to the bracket. Align the fixture’s mounting holes with the bracket screws or hooks. Carefully lift and hold the fixture while fastening it. Use the provided nuts, screws, or clips to lock the fixture in place. Double-check that the fixture is steady and does not wobble.
Testing The Light
Testing the ceiling light after installation is essential to ensure safety and proper function. This step confirms that all wiring is correct and the fixture operates as expected. A careful check prevents future electrical problems and helps you enjoy your new light without worry.
Restoring Power
First, turn the power back on at the circuit breaker. Do this slowly to avoid any electrical surges. Once the power is restored, flip the light switch to the “on” position. Watch for the light to illuminate immediately. If the light does not turn on, switch off the power and check your connections again.
Checking For Stability
Next, gently shake the light fixture to test its stability. The fixture should feel secure and not wobble. Check that all screws and mounting brackets are tight. A loose fixture can be dangerous and cause damage. Ensure the fixture is firmly attached to avoid accidents.
Troubleshooting Common Issues
If the light does not work, check the bulb first. Replace it with a new one to rule out a faulty bulb. Inspect the wiring connections in the ceiling box. Loose or incorrect wiring often causes problems. Use a voltage tester to verify power at the fixture. If issues persist, consider consulting a professional electrician for help.
When To Call A Pro
Installing a ceiling light can be a rewarding DIY task. Some projects are simple and safe to do alone. Other times, calling a professional electrician is the best choice. Knowing when to call a pro helps avoid risks and ensures the job is done right.
Handling New Wiring
Adding new wiring is complex and risky. It requires knowledge of electrical codes and safety rules. Running wires through walls or ceilings needs skill and proper tools. Mistakes may cause shocks or fires. Professionals handle wiring safely and cleanly. They also ensure connections meet local codes.
Dealing With Complex Fixtures
Some light fixtures are heavy or have many parts. Installing these fixtures can be tricky and dangerous. A pro has experience with mounting and wiring complicated lights. They know how to secure fixtures to prevent accidents. Calling a pro avoids damage to your ceiling or the fixture.
Safety And Permits
Electric work often needs permits and inspections. Licensed electricians understand local laws and get proper permits. They follow safety standards to protect your home and family. DIY installations without permits may cause insurance issues. Professionals ensure work passes inspections and is safe.
Tips For A Clean Finish
Achieving a clean finish is key when installing a ceiling light. Neat work enhances your room’s look and keeps the fixture safe. A tidy installation shows professionalism and care. Follow these simple tips to ensure your ceiling light looks great and functions well for years.
Hiding Wires
Keep wires out of sight for a sleek appearance. Use wire covers or raceways to conceal cables along the ceiling or walls. Tuck wires behind molding or inside the ceiling box. Secure wires tightly to avoid loose or hanging cords. Proper wire management prevents accidents and makes cleaning easier.
Using Decorative Covers
Decorative covers hide rough edges and wire connections. Choose covers that match your light fixture’s style and color. They come in many shapes and materials to fit any design. Install covers carefully to avoid gaps. This small detail creates a polished, professional look.
Maintaining Your Fixture
Regular cleaning keeps your ceiling light bright and fresh. Dust the fixture gently with a soft cloth or brush. Check for loose screws or parts and tighten as needed. Replace bulbs promptly to maintain good lighting. Proper care extends your fixture’s life and keeps your ceiling neat.
Frequently Asked Questions
Can I Install Ceiling Lights Myself?
Yes, you can install ceiling lights yourself if you have basic electrical knowledge and the existing wiring is safe. Always turn off the power before starting. For new wiring or heavy fixtures, hire a licensed electrician to ensure safety and code compliance.
Do I Need An Electrician To Install A New Ceiling Light?
Hiring an electrician is necessary for new wiring, heavy fixtures, or if unsure about safety. DIY suits simple fixture swaps only.
What Are Common Mistakes When Installing A Light?
Common mistakes include ignoring power shutoff, using improper tools, mismatching wires, overloading the junction box, and poor fixture support.
Which Wires Go Together When Installing A Ceiling Light?
Connect black (hot) wires together, white (neutral) wires together, and green or bare copper (ground) wires together. Match wire colors carefully. Ensure secure, tight connections for safety. Always turn off power before starting installation.
Conclusion
Installing a ceiling light can brighten any room quickly and easily. Follow each step carefully to ensure safety and proper function. Always turn off power before starting any electrical work. Use the right tools and check that the junction box can hold the fixture.
If unsure, ask a professional electrician for help. Taking time and care during installation leads to great results. Enjoy your new light and the fresh look it brings to your space.


Pingback: Best Lights for Bedroom Ceiling 2026: Top Picks for Every Style - Home Decor
Pingback: 10 Best Ceiling Lights for Basement | Brighten Up Your Dark Space