How to Install a Ceiling Light Fixture can transform a room, add brightness, and improve the overall style of your home. Many people think electrical work is too complex, but replacing or installing a ceiling light is often a straightforward job if you follow the correct steps.
With the right tools, preparation, and clear instructions, almost any homeowner can complete this task safely and confidently. This guide will show you how to install a ceiling light fixture, from start to finish, with detailed steps, expert tips, and answers to common questions.
Why Install A Ceiling Light Fixture Yourself?
Choosing to install a ceiling light fixture on your own brings several benefits. First, you can save money by avoiding electrician fees, which can range from $100 to $300 per fixture in the US. Second, DIY installation gives you control over the style and placement, making sure the fixture fits your taste and room needs. Also, this simple project helps you build basic electrical skills, which is useful for future home improvement tasks.
Many homeowners worry about safety. However, if you turn off the power and follow each step carefully, installing a ceiling light fixture is safe and manageable for most people. Still, it’s important to recognize your limits. If you ever feel unsure, ask a licensed electrician for help.
Tools And Materials You Will Need
Gathering the right tools and materials before starting will save time and reduce stress. Here’s what you’ll need for most ceiling light installations:
- New ceiling light fixture (with all parts included)
- Screwdrivers (flat-head and Phillips)
- Wire strippers/cutters
- Voltage tester or non-contact voltage detector
- Needle-nose pliers
- Wire nuts/connectors
- Electrical tape
- Drill and drill bits (sometimes needed)
- Stepladder (tall enough for safe access)
- Safety glasses
- Work gloves
- Light bulbs (the right type and wattage for your fixture)
- Mounting bracket (often comes with the fixture)
- Measuring tape
Not all tools are needed for every fixture, but having them ready will make the job smoother. If you’re replacing an old fixture, you may also need patching materials for the ceiling.
Pro Tip
Double-check the instructions included with your new light fixture. Some specialty fixtures require additional hardware or have unique steps not covered in this general guide.
:max_bytes(150000):strip_icc()/how-to-replace-ceiling-light-fixture-1824657-02-078c80a354ee404e8ca25455b15fef14.jpg)
Safety First: Preparing For Installation
Before you even touch your old light or wires, take these key safety steps:
- Turn off the power at the circuit breaker. Never trust the wall switch alone.
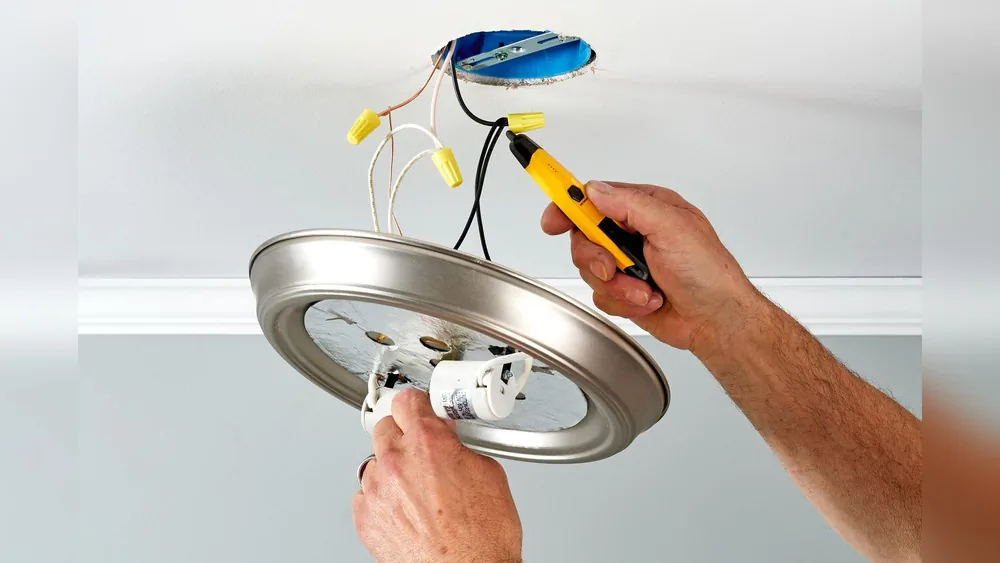
- Test for power using a voltage tester. Even when the switch is off, wires might still be live if miswired.
- Let others know you’re working. Place a note on the breaker box to avoid someone turning it back on.
Never skip these steps, even if you feel confident. Electrical accidents can be serious or fatal, so always put safety first.
What If There’s No Existing Fixture?
If there is no light fixture at all, you will need to install a ceiling electrical box and run wiring to it. This is more complex and often requires a permit. For this article, we focus on replacing or upgrading an existing ceiling light fixture.
If you need to add wiring from scratch, consult a professional or your local building codes.
Removing The Old Ceiling Light Fixture
Most ceiling light installations start by taking down the old fixture. Here’s how:
- Switch off the power at the breaker panel.
- Remove the light bulbs and shades from the old fixture.
- Unscrew the fixture base from the ceiling. Hold the fixture as you remove the screws so it doesn’t fall.
- Gently pull the fixture down. You’ll see the wiring connected with wire nuts.
- Test the wires again with your voltage tester for safety.
- Unscrew the wire nuts and disconnect the fixture wires from the house wires. Note which wires are connected (black to black, white to white, ground to ground).
- Remove the mounting bracket if you’re not using it for the new fixture.
This step-by-step process applies to the most common fixtures, such as domes, chandeliers, or flush mounts. If you run into resistance or see unexpected wiring colors, stop and consult a pro.
Common Mistakes to Avoid
People often forget to support the fixture as they remove the last screws. Ceiling lights can be heavier than they look. Use one hand to hold the fixture or ask for help.
Understanding Ceiling Wiring
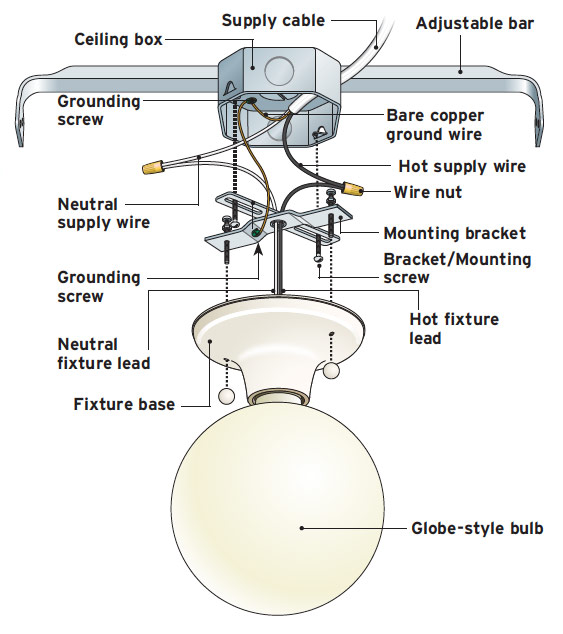
Not all homes have the same wiring, but most ceiling lights use three main wires:
- Black or red: “Hot” wire, carries power
- White: Neutral wire, completes the circuit
- Green or bare copper: Ground wire, for safety
Occasionally, you may see wires with different colors or even no ground wire in older homes. If you’re unsure, take a photo of the wires and fixture before disconnecting anything. This helps you remember where each wire goes.
What If There Are Extra Wires?
Sometimes you’ll find more than three wires, especially if your ceiling box is part of a loop or has a fan. In this case, label or photograph every connection before removing anything. If the wiring looks complicated, it’s smart to get advice from a licensed electrician.
Checking The Ceiling Electrical Box
Before installing the new fixture, check that your ceiling electrical box is strong enough. Ceiling boxes are usually made of metal or plastic and are attached to the ceiling joists.
- If your new fixture is heavier than the old one (like a chandelier or ceiling fan), you need a box rated for ceiling fans or heavy fixtures.
- The box should not move or flex when you tug on it gently.
- If you see cracks, loose screws, or a plastic box that feels weak, replace the box before proceeding.
Types Of Ceiling Boxes And Weight Limits
Here’s a simple comparison of common ceiling box types:
| Box Type | Material | Weight Limit | Use Case |
|---|---|---|---|
| Plastic Nail-On | Plastic | Up to 10 lbs | Small fixtures |
| Metal Box | Steel | Up to 50 lbs | Most fixtures |
| Fan-Rated Box | Steel/Metal | Up to 70 lbs | Ceiling fans, heavy fixtures |
If your fixture weighs more than 50 pounds, always use a fan-rated box and confirm mounting hardware is secure.
Preparing The New Fixture
Open the box and lay out all parts on a clean surface. Most fixtures include:
- Mounting bracket or strap
- Screws and wire nuts
- Fixture base or canopy
- Decorative elements (glass, shades, etc.)
Double-check that all parts are present. Read the manufacturer’s instructions, as some fixtures have unique steps or hardware.
Pre-assembly
Some fixtures need partial assembly before hanging. This might include attaching rods, chains, or decorative trim. If the fixture is large or heavy, get help to hold and mount it.
Installing The Mounting Bracket
Most ceiling lights use a mounting bracket that attaches to the ceiling box. Here’s how:
- Hold the bracket up to the box and align the screw holes.
- Insert the screws (usually provided) and tighten until secure.
- If the bracket has a ground screw (usually green), leave space to attach the ground wire.
This bracket supports the weight of the fixture and holds it flush against the ceiling.
Quick Troubleshooting
If the new bracket doesn’t fit your ceiling box, use the old one or buy a universal mounting bracket from a hardware store.
Connecting The Wires
This step is the heart of the installation. Take your time and follow these steps:
- Confirm the power is still off with your voltage tester.
- Strip 1/2 inch of insulation from each fixture wire, if needed.
- Connect the wires:
- Black (fixture) to black (ceiling)
- White (fixture) to white (ceiling)
- Green or bare (fixture) to green or bare (ceiling box), or to the green screw on the bracket
- Twist the wires together clockwise and screw on a wire nut until tight.
- Wrap with electrical tape for extra safety.
- Tuck wires neatly into the ceiling box.
What If The Colors Don’t Match?
If your new fixture wires are different colors, check the instructions. Some modern lights use blue or gray for the hot wire. When in doubt, ask the manufacturer or a professional. Never guess with electrical wiring.
Handling Ground Wires
All modern fixtures need to be grounded for safety. If there’s no ground wire in your ceiling, use the metal box (if it’s grounded) or consult an electrician. Never skip grounding—it protects against electric shocks.
Attaching The New Light Fixture
With wiring complete, it’s time to mount your light. The process depends on the fixture design:
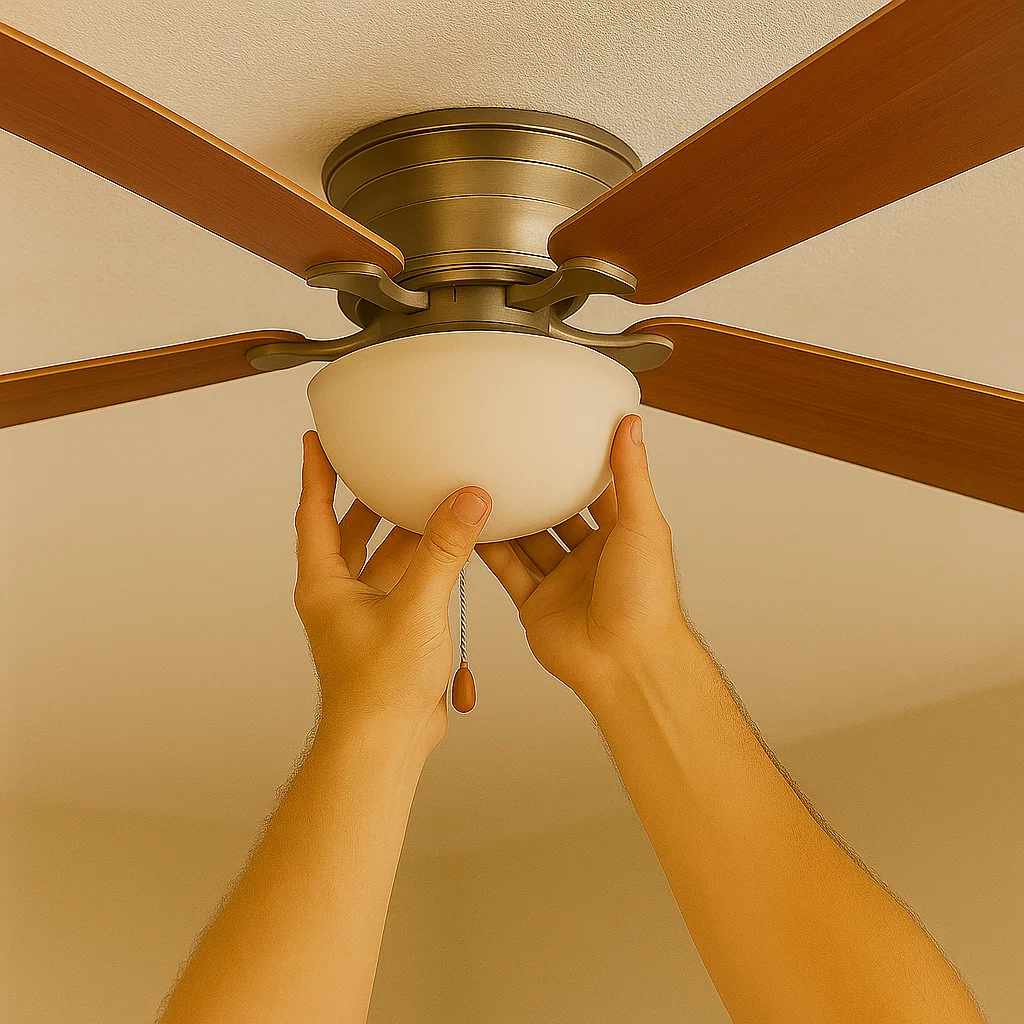
- Flush mount: Raise the base to the bracket and insert the mounting screws. Tighten until snug.
- Hanging fixture: Attach the chain or rod, connect to the bracket, and secure with screws or a locking nut.
- Chandelier: Ask for help to support the weight as you connect the wires and mounting hardware.
Check that the fixture is level and sits firmly against the ceiling. Don’t overtighten, as this can crack glass or bend the bracket.
Securing Large Fixtures
For heavy chandeliers or fans, always follow the weight ratings and use two people for safety. Sometimes, a support cable is included for extra strength.
Installing Light Bulbs And Shades
Now it’s time for the finishing touches:
- Insert the recommended bulbs. Check the fixture label for maximum wattage.
- Attach shades, globes, or covers. Handle glass with care to avoid cracks or fingerprints.
- Double-check all screws and connections.
Using bulbs that are too powerful can overheat the fixture or wiring. Always match the suggested wattage and bulb type.
Turning On The Power And Testing
Return to your breaker panel and switch the power back on. At the wall switch, turn on your new light. It should light up immediately.
- If the light does not turn on, switch off the breaker and check your wiring.
- Flickering or buzzing often means a loose connection or the wrong type of bulb.
- If you smell burning or see smoke, turn off the power at once and call an electrician.
Troubleshooting Common Problems
Here’s a quick reference for common issues:
| Problem | Possible Cause | Solution |
|---|---|---|
| The light won’t turn on | Loose wire, wrong wiring, dead bulb | Check wiring and bulb type |
| Flickering light | Loose connection, poor contact | Retighten wire nuts, check sockets |
| Breaker trips | Short circuit, overload | Inspect wiring, use correct bulb wattage |
| Buzzing sound | Dimmer compatibility, loose part | Use compatible bulbs, tighten parts |
Cleaning Up And Final Checks
After installation, clean up your work area:
- Remove all tools, packaging, and old fixture parts.
- Wipe the new fixture with a soft cloth to remove dust and fingerprints.
- Check that all screws and glass covers are secure.
Take a moment to admire your new light. Confirm that switches and dimmers work as expected.
Upgrading To Modern Fixtures: LED and Smart Lights
Today’s ceiling lights offer more than just style. Many homeowners are choosing LED fixtures and smart lights for energy savings and convenience.
- LED lights use up to 80% less energy and last 10–20 years without replacement.
- Smart fixtures connect to Wi-Fi or Bluetooth and can be controlled by phone or voice commands.
If you install a smart fixture, follow the manufacturer’s app instructions for setup after installation. Make sure your home’s Wi-Fi signal is strong in the room for best results.
Are Led Fixtures Wired Differently?
Most LED fixtures wire up the same as traditional ones (black to black, white to white, ground to ground). Some have built-in drivers or special connectors. If your fixture has extra wires or a control box, follow the included instructions closely.
Important Safety And Code Reminders
While installing a ceiling light fixture is a common DIY project, always remember:
- Local codes: Some areas require permits or inspections for electrical work.
- Old wiring: Homes built before 1970 may have outdated wiring. If you see cloth-covered wires or no ground, call a pro.
- Moisture zones: For bathrooms or outdoor fixtures, use damp- or wet-rated fixtures only.
- Multiple switches: If your light is controlled by more than one switch (three-way or four-way), wiring can be more complex.
If in doubt, hiring an electrician may cost more upfront but guarantees safety and peace of mind. The National Electrical Code (NEC) offers standards for all home electrical work. You can learn more from the National Fire Protection Association.
Non-obvious Tips Most Beginners Miss
- Take photos before disconnecting anything. This makes it much easier to remember wire placement, especially with unusual wiring.
- Save the old wire nuts. Sometimes the nuts provided with new fixtures are lower quality.
- Check your ceiling paint. Removing an old fixture may expose unpainted areas. Have ceiling paint handy for touch-ups.
- Label wires with tape. If your wiring is complex, write “black,” “white,” or “ground” on masking tape and stick it to each wire.
- Don’t overtighten glass shades. This is a common cause of cracks and breaks.
These small steps can save you time, money, and headaches during your project.
When To Call A Professional
Certain situations call for expert help:
- Your wiring is old, damaged, or confusing.
- The ceiling box is loose, damaged, or missing.
- You’re installing a heavy chandelier or fan.
- The fixture is near water (bathroom, kitchen, outdoors).
- You don’t feel comfortable working with electricity.
Safety always comes first. There’s no shame in asking for help—many electrical fires start from simple DIY mistakes.
Cost And Time Estimates
Most ceiling light fixture installations take 30 minutes to 2 hours for a standard fixture. More complex installations (like a chandelier or a fixture in a tricky spot) can take longer.
- Average DIY cost: $40–$300 for materials (light fixture, bulbs, tools)
- Electrician cost: $100–$300 for labor, plus parts
- Time to complete: 1–2 hours for most jobs
Remember to factor in time for setup, cleanup, and any extra painting or patching.
Frequently Asked Questions
How Do I Know If My Ceiling Box Can Support A Heavy Fixture?
Check the inside of the box for a label stating the weight rating. If it’s plastic, it’s usually for lightweight fixtures only. Metal or fan-rated boxes can support heavier lights or fans. If you’re unsure, replace the box with a fan-rated model before installing a heavy light.
What Should I Do If My Wires Are Different Colors Than Described?
Take a clear photo of the wiring before disconnecting. Typically, black or red is hot, white is neutral, and green or bare is ground, but older homes might have different colors. If you can’t match the wires confidently, consult a licensed electrician.
Can I Install A Ceiling Light Fixture Without A Ground Wire?
Modern codes require grounding for safety. If your box or wiring has no ground, use a metal box that’s properly grounded, or run a ground wire from the main panel. For safety, never skip grounding—it protects against shocks and electrical fires.
Why Does My New Fixture Flicker Or Buzz?
Flickering or buzzing usually means a loose connection, incompatible bulb, or a dimmer switch that’s not designed for the bulb type (such as non-LED dimmers with LED bulbs). Double-check all connections and use the right dimmer and bulbs for your fixture.
Is It Safe To Install A Ceiling Light In A Bathroom?
Yes, but only with a damp-rated or wet-rated fixture, depending on the location. Lights near showers or tubs need special protection. Always follow manufacturer guidelines and local building codes for bathroom installations.
Installing a ceiling light fixture is a great way to refresh a space and improve lighting. With planning, the right tools, and careful attention to safety, you can complete this project in an afternoon. Remember to check all wiring, use the correct ceiling box, and never rush electrical work. If you run into issues, don’t hesitate to reach out to a licensed electrician or consult resources such as the Family Handyman for further guidance.
A new ceiling light can make any room brighter, more inviting, and stylish—enjoy your home’s new look and the satisfaction of a job well done.