How to Fix a Ceiling Light Bulb Socket, loose, or just not working right? The problem might be your light bulb socket.
Fixing a ceiling light bulb socket may sound tricky, but with the right steps, you can handle it yourself—and save time and money. In this guide, you’ll learn simple, clear instructions to get your light working safely and quickly. Keep reading, and you’ll discover how easy it is to restore the glow to your room with a few basic tools and a little know-how.
Don’t let a faulty socket keep your space in the dark—let’s fix it together!
Safety First
Safety is the top priority when fixing a ceiling light bulb socket. Electrical work can cause shocks or fires. Careful steps keep you and your home safe. Follow simple rules to avoid accidents.
Take your time and focus on safety before starting any repair. Proper preparation reduces risks and makes the job easier.
Turn Off Power
Always switch off the power at the circuit breaker. Do not rely on the light switch alone. Confirm the power is off to prevent electric shock. This step protects you from live wires.
Use Proper Tools
Use insulated tools designed for electrical work. A screwdriver with a rubber handle is safer. Avoid using metal tools that can conduct electricity. Good tools help you work safely and efficiently.
Test For Electricity
Use a voltage tester to check for any power in the socket. Test both before and after turning off the breaker. This ensures no current flows to the fixture. Never skip this step, even if the power is off.
Accessing The Socket
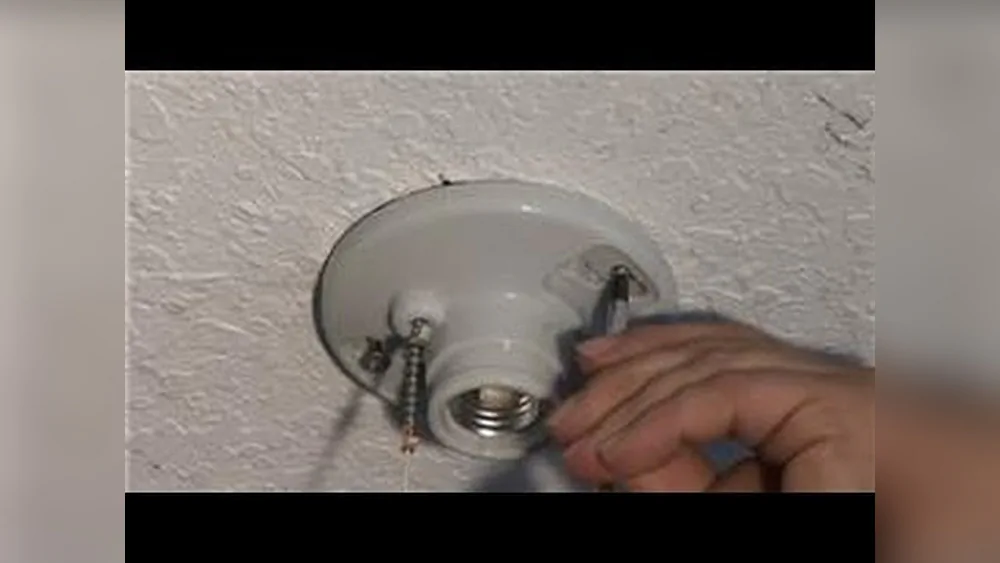
Accessing the socket is the first step to fix a ceiling light bulb socket. It involves carefully removing the parts that cover the socket. This allows you to see the wiring and the socket itself. Follow these simple steps to safely access the socket.
Remove Light Fixture Cover
Start by turning off the power at the circuit breaker. This prevents any electrical shock. Next, gently remove the light fixture cover or globe. Some covers twist off, while others may have clips or screws. Use a ladder or step stool to reach the fixture safely. Set the cover aside in a safe place.
Loosen Ceiling Fixture
After removing the cover, locate the screws or nuts holding the fixture to the ceiling. Use a screwdriver or wrench to loosen these fasteners. Carefully lower the fixture a few inches to expose the socket. Support the fixture with one hand to avoid dropping it. This step gives clear access to the bulb socket and wiring.
Inspect Wiring
Look closely at the wires connected to the socket. Check for any signs of damage, such as frayed or loose wires. Make sure the wires are firmly connected to the socket terminals. If wiring looks worn or unsafe, avoid touching and call a professional electrician. Proper inspection ensures safety and helps identify the socket problem.
Removing The Old Socket
Removing the old ceiling light bulb socket is the first step in a safe and effective repair. This process requires careful attention to avoid damage to the fixture or wiring. Follow these steps to remove the old socket correctly and prepare for a new installation.
Disconnect Wiring
Start by turning off the power at the circuit breaker. Use a voltage tester to confirm no electricity flows to the socket. Carefully disconnect the wires from the socket terminals. Note the wire positions to ensure correct reconnection later.
Unscrew The Socket
Locate the screws or clips holding the socket in place. Use a screwdriver to loosen these fasteners gently. Remove the socket from the fixture base without forcing it. Keep the screws safe for reassembly.
Handle Fragile Components
Ceiling light fixtures often contain delicate parts like glass covers or thin wiring. Hold the socket firmly but gently to avoid breakage. Place all removed parts on a soft surface to prevent scratches or cracks. Take your time to avoid accidents.

Inspecting And Diagnosing
Inspecting and diagnosing the ceiling light bulb socket is the first step to fix it. Careful examination helps find the problem fast. It saves time and prevents extra damage. Follow these steps to check the socket condition properly.
Check For Damage
Look closely at the socket for cracks or burns. Damage often causes poor contact or electrical issues. A cracked socket can be unsafe and needs replacement. Burn marks may show overheating or short circuits. Do not ignore any visible damage.
Look For Loose Connections
Loose wires can stop the light from working. Gently wiggle the wires connected to the socket. If any wire moves easily, it might be loose. Tighten screws or connectors to secure the wires. Proper connection ensures steady power flow.
Assess Socket Condition
Check the socket’s metal parts for corrosion or rust. Corrosion reduces electrical contact and causes flickering. The socket should hold the bulb firmly without wobbling. If it feels weak or worn out, consider replacing it. A good socket improves light performance and safety.
Installing The New Socket
Installing the new socket is a key step in fixing your ceiling light bulb socket. This process requires care and attention to detail. Proper installation ensures the light works safely and lasts long. Follow the steps below to install your new socket correctly.
Attach Wiring Correctly
Start by connecting the wires to the new socket. Match the wire colors exactly as before. Usually, black or red wires connect to the brass screw. White wires go to the silver screw. Tighten the screws firmly to hold the wires. Avoid loose connections to prevent flickering or shorts.
Secure Socket In Place
Once wiring is attached, position the socket in the fixture. Align any mounting holes carefully. Use screws or clips to fasten the socket tightly. Check that it does not move or wiggle. A secure socket keeps the bulb stable and the fixture safe.
Reassemble Fixture
After the socket is secured, put the fixture back together. Replace any covers or glass globes you removed. Screw or clip parts firmly without over-tightening. Restore the fixture’s original look and function. Finally, turn the power back on and test the light.

Fixing Common Issues
Fixing common issues with a ceiling light bulb socket improves safety and restores proper function. Many problems arise from wear or loose parts. Some fixes require simple tools and a few minutes of work. Understanding these common issues helps you tackle them confidently and keep your lighting reliable.
Tighten Loose Socket
A loose socket causes flickering or no light at all. Turn off power before starting any work. Remove the light bulb and check the socket’s base. Use a screwdriver to tighten any screws holding the socket. If the socket wiggles, secure it firmly to the fixture. Tightening prevents poor contact and ensures steady light.
Replace Broken Pull Chain
A broken pull chain stops the light from turning on or off. Cut power at the breaker panel first. Remove the fixture cover to access the switch assembly. Inspect the chain for damage or if it has come off the gear. Reinsert the chain carefully or replace the switch if broken. Installing a new chain restores control to the light.
Lubricate Stiff Mechanisms
Stiff pull chains or switches can be hard to operate. Turn off the power before touching any parts. Apply a small amount of electrical-safe lubricant to the chain and switch gears. Move the chain gently to spread the lubricant evenly. Lubrication smooths movement and prevents future stiffness. Avoid using too much to stop dirt buildup.
Testing The Repair
Testing the repair of a ceiling light bulb socket is a key step. It confirms the socket works correctly and safely. This process ensures your hard work pays off without hazards. Follow clear steps to restore power, check function, and troubleshoot.
Restore Power Safely
Start by turning the power back on at the circuit breaker. Avoid using the wall switch yet. Use a voltage tester to confirm power reaches the socket wires. Double-check all connections are secure and insulated. Safety comes first to prevent shocks or shorts.
Check For Proper Function
Screw in a working light bulb carefully. Flip the wall switch on to see if the bulb lights up. Watch for steady light without flickering or dimming. A stable glow shows the socket works well. Test the socket several times to be sure it holds power.
Troubleshoot If Needed
If the bulb does not light, turn off power immediately. Inspect wiring for loose or damaged connections. Look for corrosion or burnt marks inside the socket. Tighten screws and clean contacts gently with a dry cloth. Replace the socket if issues persist after checks.

When To Call A Professional
Knowing when to call a professional is key to safely fixing a ceiling light bulb socket. Some issues go beyond simple DIY fixes. Handling electrical parts without proper skills can be risky. Professionals have the tools and knowledge to solve tough problems fast. Choosing the right time to get help protects your home and your safety.
Complex Wiring Problems
Wiring inside the ceiling can be confusing and dangerous. If wires look tangled, burned, or broken, do not try to fix it yourself. A professional electrician can check the wiring and fix any faults. They ensure everything meets safety standards and prevent future hazards.
Damaged Ceiling Fixtures
Fixtures that are cracked, loose, or broken need expert care. Damage to the fixture can affect the socket and wiring. Professionals can replace or repair the fixture correctly. This prevents further damage and keeps the light working properly.
Persistent Electrical Issues
Lights that keep flickering or sockets that do not hold bulbs well show deeper problems. If the socket or wiring causes repeated failures, call a professional. They can find hidden issues and fix them safely. Persistent problems require expert attention to avoid fire risks.
Frequently Asked Questions
How To Fix A Light Socket In A Ceiling Fixture?
Turn off the power at the breaker. Remove the fixture cover and globe. Disconnect wiring and unscrew the old socket. Install the new socket, reconnect wires, and secure the fixture. Restore power and test the light.
How To Fix A Light When The Pull Chain Breaks?
Turn off power at the breaker. Remove the fixture cover to access the pull chain. Reattach or replace the chain switch assembly if broken. Lubricate the mechanism if stiff. Reassemble the fixture and restore power.
How To Replace A Broken Light Bulb Socket?
Turn off power at the breaker. Remove the fixture and disconnect wires. Unscrew the broken socket, install a new one, and reconnect wires. Secure the fixture and restore power. Test the new socket for proper function.
How To Put A Light Socket Back Together?
Turn off power and remove the socket from the fixture. Align wires correctly, reconnect them securely, then snap the socket shell back in place. Tighten any screws and test the socket by restoring power.
Conclusion
Fixing a ceiling light bulb socket is simple and safe with care. Always cut power before starting any repair work. Use the right tools to remove and replace the socket. Check connections carefully to avoid flickering or no light. Taking these steps helps your light work well again.
This small fix saves money and time. Keep your home bright and safe by handling repairs yourself. Practice caution and enjoy steady, reliable lighting every day.