How to Hang Art on Concrete Walls: A Simple Guide
Hanging art on a concrete wall can be a little tricky, but with the right tools and techniques, it is possible to display your favorite pieces safely and beautifully. Whether you’re trying to decorate a new space or make use of a blank wall in your home, this guide will help you get your artwork up on the concrete wall without any hassle.
Why is it Difficult to Hang Art on Concrete?
Concrete walls are very different from regular drywalls, which are softer and easier to work with. Concrete is solid, dense, and difficult to drill through. This makes it harder to use traditional nails or screws. However, don’t worry! We will guide you through the steps and show you the best methods for hanging your artwork securely.
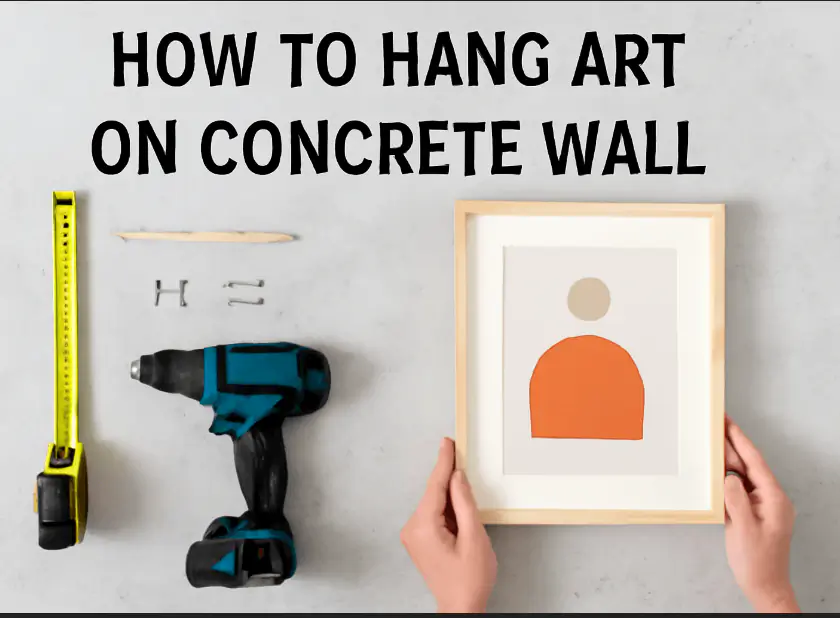
What You Need to Hang Art on Concrete Walls
Before we start, make sure you have the right tools and materials. You don’t need a lot of fancy equipment, just some basic things you probably already have at home.
-
Measuring Tape
A measuring tape is essential to ensure that your art is placed at the right height and position. -
Level
A-level will help you keep your art straight. You don’t want it leaning to one side! -
Pencil
A pencil will be used to mark where you need to drill holes. Make sure the marks are light and easy to erase later. -
Drill
A powerful drill with a masonry bit is needed to make holes in the concrete. Make sure the drill is strong enough to handle the hardness of the wall. -
Wall Anchors
Wall anchors are a must-have for concrete walls. They help hold screws in place and ensure that your artwork stays securely mounted. -
Screws or Hooks
Use screws that are long and strong enough to support the weight of your art. Picture hooks are an alternative, but they usually work better on softer materials like wood or drywall. -
Safety Gear
When working with a drill, it’s important to wear protective eyewear and gloves. You’ll also want to wear a dust mask, as drilling into concrete can create a lot of dust.
Step-by-Step Instructions for Hanging Art on Concrete Walls
Now that you have your materials, let’s get started with the steps to hang your art.
1. Choose the Right Spot for Your Artwork
Before you start drilling, think carefully about where you want to hang your artwork. Consider the size of the wall and the artwork. The placement should create balance and harmony in the room. If you’re unsure, try holding the artwork up on the wall to get an idea of how it will look.
2. Measure the Height and Position
Once you know where you want the art to go, use your measuring tape to measure the height and width. Most people prefer to hang their art about 57 to 60 inches from the floor to the center of the artwork. This is considered an ideal height for viewing.
3. Mark the Wall Lightly with a Pencil
Use a pencil to mark the spots where you will drill. Make sure the marks are level. You can use the level tool to check that everything is even. If you’re hanging multiple pieces, use a measuring tape to make sure they are spaced evenly.
4. Drill Holes in the Wall
Next, it’s time to drill. Start by selecting a masonry bit for your drill. A masonry bit is designed for tough materials like concrete and stone. Use the drill at a low speed to start. Drilling into concrete can cause dust and debris to fly around, so make sure to wear safety glasses and a mask.
When you drill, apply steady pressure, but don’t push too hard. Let the drill do the work. Drill until the hole is deep enough to fit a wall anchor.
5. Insert Wall Anchors
Once you’ve drilled the holes, insert wall anchors into the holes. These anchors will hold the screws securely in place and prevent them from pulling out of the concrete. You may need to tap them gently with a hammer to make sure they’re seated properly.
6. Screw in the Hooks or Screws
Now, it’s time to screw in the hooks or screws. If you’re using picture hooks, make sure they are strong enough to support the weight of your artwork. Screw them into the wall anchors you installed earlier. Make sure they’re tight and secure.
7. Hang the Artwork
Once the screws or hooks are in place, hang the artwork. If you’re using picture hanging wire, attach the wire to the back of the frame and hang it on the hooks. If you have a heavier piece, you might need to use two hooks for added support.
Use the level once again to make sure the artwork is straight. Adjust the position if necessary.
8. Check the Artwork’s Stability
Finally, give the artwork a little shake to make sure it’s secure. If it feels loose or unstable, add more screws or wall anchors for extra support.
Alternatives to Drilling into Concrete
If you don’t want to drill into the concrete wall, there are a few other methods you can try. These methods are less permanent but still effective.
1. Use Adhesive Hooks or Strips
For lighter artwork, you can use adhesive hooks or strips. These are easy to apply and remove without damaging the wall. They are perfect for smaller pieces, but keep in mind that they may not hold up heavy artwork.
2. Tension Rods or Rails
Another option is to use tension rods or rails that stretch across the width of the wall. These can be placed between two walls or other supports, and you can hang your artwork from them using clips or hooks.
3. Freestanding Easels or Frames
If you don’t want to attach anything to the wall, you can use a freestanding easel or a frame with a stand. This way, you can place the artwork on the floor or on a table without drilling into the concrete wall.
Tips for Hanging Heavy Artwork
If your artwork is heavy, you need to be extra careful to make sure it is securely mounted. Here are a few tips:
-
Use Stronger Wall Anchors
For heavier pieces, use heavier-duty wall anchors and screws. You may need to use multiple anchors for added support. -
Consider a French Cleat System
A French cleat system is a type of mounting system that is often used for heavy artwork. It consists of two interlocking pieces of wood or metal that can support the weight of large, heavy items. This system can be used on concrete walls and provides excellent support. -
Use Two Hooks for Balance
Instead of using just one hook, use two hooks to help balance the weight of the artwork. This will ensure that the artwork hangs evenly and securely.
Troubleshooting Common Issues
Sometimes, things don’t go exactly as planned. Here are a few problems you might encounter while hanging art on concrete walls, and how to fix them.
1. The Drill Won’t Go Through the Concrete
If your drill is struggling to make a hole, it could be because the masonry bit is dull or the drill is not powerful enough. Try using a higher-powered drill or a new masonry bit. You may also need to apply more pressure, but be careful not to push too hard.
2. The Wall Anchor Won’t Fit
If the wall anchor is too big or too small for the hole you drilled, try using a different size. Make sure the anchors fit snugly in the holes. If necessary, use a different type of anchor that’s better suited for concrete.
3. The Artwork Keeps Tilting or Falling Off
If your artwork is tilting or falling off, it could be due to weak hooks or screws. Make sure you’re using strong enough hardware for the weight of the artwork. You may also want to use additional hooks or wall anchors for extra security.
Conclusion
Hanging art on a concrete wall doesn’t have to be a challenge. By following the right steps and using the proper tools, you can safely and securely display your artwork. Whether you’re drilling into the concrete or using alternatives like adhesive strips, these methods will help you achieve a professional look. With a little patience and the right equipment, you can turn any concrete wall into a beautiful art gallery.


Pingback: How to Decorate a Studio Apartment | Best Small Space Ideas-2026